Stabilizing Shaky Footage
So you shot something awesome and dropped it in your timeline only to find out it is a tad bit shaky, ok maybe a lot bit shaky. Don't panic! We all do it from time to time and if you've got After Effects CC you're covered. In this post I'm going to quickly show you how to stabilize those shots that have a case of the shakes. Alright so drop the footage into AE and apply the effect "Warp Stabilizer VFX." Here you can play around with the settings and better match them to your footage.
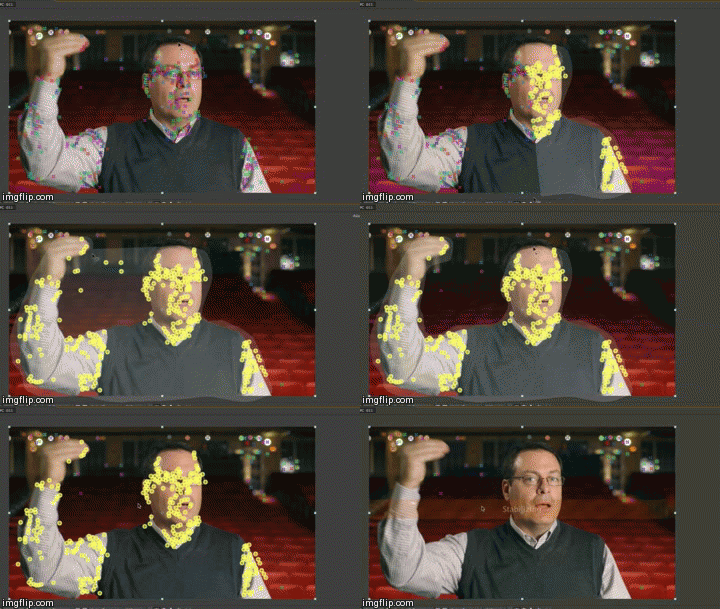
These are the settings I prefer and if you're lucky this may be all you have to do. However, chances are your footage will be stabilized but have a weird look too it, some may call it "warped." So now you are going to have to go through the video and "pin" the object you want stabilized in place. This can be a somewhat time consuming process but it is worth it. You do this by deleting unwanted track points. First check the "Show track points" box in your effects panel. AE's new and improved 3D camera tracker now lets you see tons of little colorful "x" marks across the screen. They will move and change across your footage. So what you will do is select the track points you don't need, ones that are not on the object you want stabilized. Here is the example:
In our clip the shakiness was most evident in our background, so what we did was delete all of tracking points on our subject and leave only the ones attached to the background. This will tell the effect to only use those tracking points when stabilizing the footage. Before you start you will want to make sure the "Auto-delete Points Across Time" box is checked and you might want to turn the size up a bit. Start this process at the beginning of your timeline and repeat it about every five or ten frames (Shift, PageDown) because new tracking points will regenerate as the subject continues to move. If you do this for all of your shaky spots (for really bad shake do your whole timeline) you should eliminate most, if not all, of your shakiness. Also remember to deselect the "Show Track Points" option when you are done deleting track points. Here is what ours ended up looking like:
As you can see we eliminated all of the distracting shake of our background but kept all of the motion of our subject. Look closely at the lights and seats in the before and after. This may be one of my favorite AE features ever! I hope this helps save some of your shaky footage like it did ours! Thanks for reading! -Jake


